What is the SQL Server equivalent to Access NZ() function?
Access SQL
- NZ([Event Timestamp])
SQL Server Equivalent
- COALESCE([Event Timestamp],0)
- ISNULL([Event Timestamp],0)
- do not confuse this with the Access isnull() function.
The Microsoft Office Suite has a number of tools for communicating between its products, the most powerful of which is Office Automation through VBA (Visual Basic for Applications). By exposing the underlying object model for each of its applications, Microsoft made it possible to exercise programmatic control not only within a particular application, but between applications.
In my last article, Easy Excel Charting from Access, I showed how to create Excel chart from Access. The charting capabilities of Access using MS Graph are fairly primitive, so by sending the data to Excel, I can have a much richer set of charting tools. However, what I never covered is what to do with charts once they've been created.
It would be useful to paste these charts into an Access report, but that's not possible. However, it is possible to programmatically create a Word document, write data from your database to it, and then paste the appropriate chart into the document, making Word a very powerful and flexible reporting tool for Access.
Creating the Template
First thing to do is create a Word template. Word templates are Word documents saved with a DOTX extension. When you open a template, Word creates a new document based on the template. So the template itself is never modified. This makes it ideal for my purposes here. I'll create a template with the basic structure of my document and static text. As an additional benefit, an end user can modify the static parts of the document without requiring program modification.
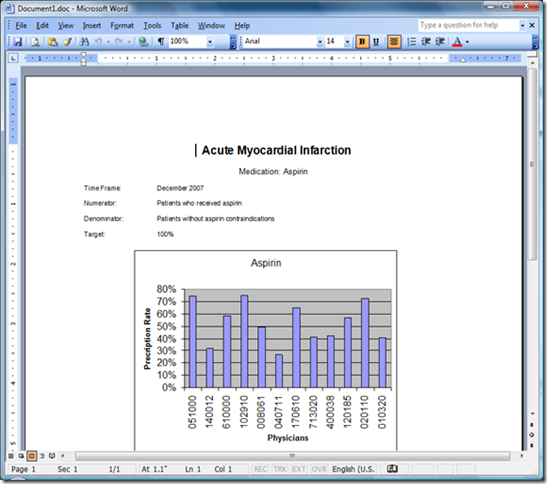
There is no single right way to create the template, but perhaps the easiest is to first create a document that looks like the finished report. Something like Figure 1.
Figure 1: Create a document that will look like the final report.
Most of the information on this report, including the chart, will be filled in from information stored in the database. In order to create places for the information to be inserted, I need to create bookmarks. Bookmarks are placeholders within your Word document.
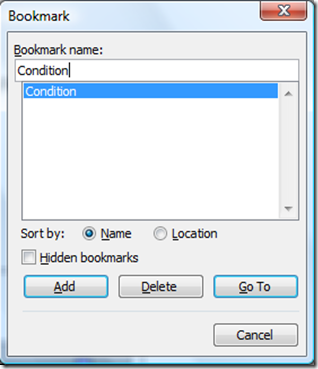
To create a bookmark, I place my cursor where I want the bookmark to go and click on Insert>Bookmark. A dialog box like Figure 2 will appear. I type in the name for my bookmark (in this case Condition) and click Add. I now have a bookmark. By default, bookmarks are invisible, so in order to see them, I click to Tools>Options on the menu bar and click the Bookmarks checkbox. The bookmark will show up as a gray I-bar. See figure 3.
Figure 2: Bookmark dialog showing the newly created Condition bookmark.
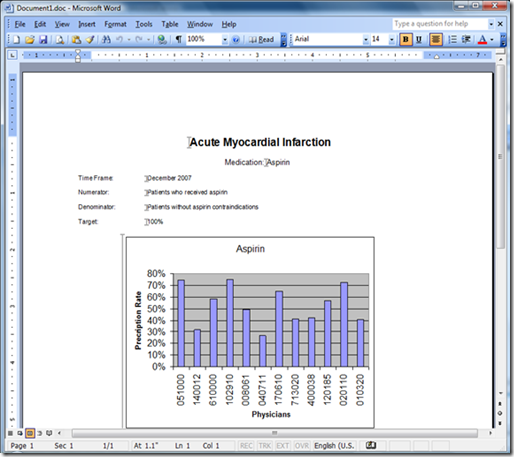
Place the cursor at the spots where the other bookmarks should be created and repeat the operation. When done, it will look like figure 3.
Figure 3: Document with bookmarks created.
All that is left to do is erase the information following the bookmarks and save the document as a Word template.
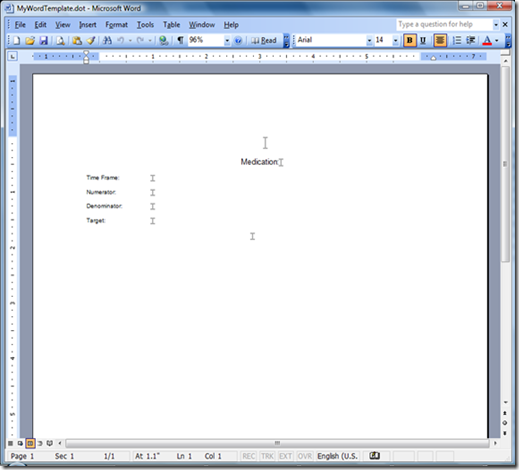
Word always wants to store templates in the default Templates folder in Program Files. Depending on how Office was installed, this folder could be different places on different machines. Therefore, I prefer to store the template in the same folder as the Access database or perhaps in a subfolder. This has the advantage of allowing the program to always know where the template is because as I will show later, I can programmatically determine the path to the application. So after I select Word Template (*.dot) in the File Type dropdown box, I browse to the correct folder to save the template. Figure 4 shows the completed template.
Once the template is created, I can re-hide the bookmarks. They don't need to be visible to work.
Figure 4: Completed template.
Automation Program Overview
Next, I create the Access subroutine (called ExcelWordAutomation), which automates the process of creating the Word documents. The overall process goes something like this:
Setting a Reference to Word and Excel
Next, I switch to Access to create the export routine. But before I do that, I need to set a reference to Excel in Access. A reference is a call to an external code library, in this case the Excel Object Model. This will allow me to manipulate Excel objects from within Access.
To set a reference, I open the Visual Basic Editor. Then I go to Tools > References. In the dialog box, scroll down to Microsoft Word 15.0 Object Library and Microsoft Excel 15.0 Object Library (your version numbers may vary). Click the checkbox next to it and click OK. Figure 1 shows what the References Dialog looks like.

Figure 1: The References Dialog showing the Word and Excel Object Library reference.
So let's look at the program details. As always, I start the routine with a call to an Error Handler to trap a number of common errors. I'll explain the specific errors later.
Sub ExcelWordAutomation()
On Error GoTo HandleError
Then I need to declare a number of variables. In order to create and manipulate objects in Word or Excel, I need some object variables. The power of Office Automation is that Word or Excel object variables inherit the capabilities of the parent program. Ordinarily, I’d define them here, but for clarity, I’m going to define them throughout the code where they’re needed.
Next, I need some Access object variables.
Dim db As DAO.Database
Dim rsReportData As DAO.Recordset
Dim rsExclusions As DAO.Recordset
And lastly, I need some scalar variables.
Dim strsql As String
Dim strFile As String
Dim conPath As String
Dim X As Long
Dim wdGoToBookmark As Integer
As I mentioned earlier, I need to find the folder where the database resides. This is where the template is stored and also where I'll save the completed documents. Naturally, if I wanted the files stored elsewhere (say a specific directory), I could code that here, too. Fortunately, I can easily find the full path and file name of the database by using the Name property of the database object.
To do this, I'll instantiate a database variable with the CurrentDb function. Then with judicious use of the Mid, Len, and Dir functions, I can return the default folder, that is, the folder where the database resides.
Set db = CurrentDb
conPath = CurrentProject.Path
Since I have a single workbook which contains all the charts I need, each on a separate sheet, I'll open that first. In order to do that, I will instantiate first an Excel application object and then a workbook object.
Dim objXLBook As Excel.Workbook
Set objXLBook = objXLApp.Workbooks.Open(conPath & "\MySpreadsheetChart.xlsx")
In order to be able to watch the process of copying the charts, I'm going to make both Excel and the workbook visible. Technically, this is not necessary. The code will work just as well if Excel remains invisible, but it's interesting to watch the process.
objXLApp.Visible = True
objXLBook.Windows(1).Visible = True
Now, I need to open a recordset containing the data needed for the reports. This information is stored in a table called ReportData (see Figure 5).
Set rsReportData = db.OpenRecordset("ReportData", dbOpenSnapshot)
Figure 5: Table which stores the data to be inserted in each report.
Since each record contains the information for a single report, I'll step through the records one at a time, creating a Word document for each. A Do…While loop will work perfectly for this.
Do While Not rsReportData.EOF
Just as I did with Excel, I have to create a Word object. With Word, however, I only need to create the application object. I'll also open a new document based on the MyWordTemplate.dot template.
Dim objWord As New Word.Application
Set objWord = CreateObject("Word.Application")
objWord.Documents.Add conPath & "\MyWordTemplate.dotx"
And, again, I'll make them both visible. Like the Excel objects, these lines are optional.
objWord.Visible = True
objWord.Windows(1).Visible = True
Now that my document is created, I need to find the appropriate bookmarks and insert information from my recordset. Here, I use the "With…End With" construct to avoid having to repeat the objWord.ActiveDocument.Bookmarks object reference for each bookmark.
With objWord.ActiveDocument.Bookmarks
.Item("Condition").Range.Text = rsReportData!Condition
.Item("Medication").Range.Text = rsReportData!Medication
.Item("Timeframe").Range.Text = rsReportData!TimeFrame
.Item("Numerator").Range.Text = rsReportData!NumeratorDef
.Item("Denominator").Range.Text = rsReportData!DenominatorDef
.Item("Target").Range.Text = rsReportData!Target
End With
'find and write exclusion data
strsql = "SELECT ReportID, Exclusion " & _
"FROM ExclusionData " & _
"WHERE ReportID=" & rsReportData!ReportID
Set rsExclusions = db.OpenRecordset(strsql)
Do While Not rsExclusions.EOF
With objWord.ActiveDocument.Bookmarks
.Item("exclusions").Range.Text = rsExclusions!Exclusion & vbCrLf
rsExclusions.MoveNext
End With
Loop
rsExclusions.Close
To paste the chart into the document, I'm going to use the Windows Clipboard. So I have to switch to my already open Excel workbook, find the sheet matching the medication value in my recordset and copy it to the clipboard.
objXLBook.Sheets(rsReportData!Medication.Value).Select
objXLBook.ActiveSheet.ChartObjects("Chart 1").Activate
objXLBook.ActiveChart.ChartArea.Select
objXLBook.ActiveChart.ChartArea.Copy
Then I return to my Word document, move my cursor to the "Chart" bookmark, and paste the chart into the document. In this case, setting the Word object to visible is mandatory. This method of pasting from the clipboard requires the object to be activated, and in order to be activated, it must be visible.
objWord.Activate
wdGoToBookmark = -1
objWord.Selection.Goto What:=wdGoToBookmark, Name:="Chart"
objWord.Selection.Paste
That's all I need in the document, so I'll save the document in the same directory as the template, naming it after the medication value in my recordset.
objWord.ActiveDocument.SaveAs (conPath & "\" & rsReportData!Medication & ".docx")
objWord.Quit
And then, I return to process the next record, looping until the recordset until done.
rsReportData.MoveNext
Loop
After I've processed all the records, I'm done with the Excel workbook, so I'll close it without saving and close Excel.
objXLBook.Close SaveChanges:=False
objXLApp.Workbooks.Close
objXLApp.Quit
Then I add a message box that identifies when the process is done.
MsgBox "Done!" & vbCrLf & vbCrLf & _
"Look in this directory" & vbCrLf & conPath & vbCrLf & _
"for your documents."
Lastly, I complete the error trapping. After the ProcDone label, I'll destroy the object variables I've created. I do that here so if there is an error and the routine terminates, no Word, Excel, or Access object will be left in memory.
ProcDone:
' clean up our object variables
Set objXLBook = Nothing
Set objXLApp = Nothing
Set objWord = Nothing
Set rsReportData = Nothing
Set rsExclusions = Nothing
Set db = Nothing
ExitHere:
Exit Sub
There are three main errors that must be handled. Error 432 occurs if the Excel spreadsheet is not found. Since no other objects are open, I just want it to end the routine without doing anything else. Error 5151 occurs if the Word Template does not exist. In that case, I want the routine to close the Open Excel object and end the program. Error 4152 can happen in a variety of circumstances, all of which come down to an error in the file or path. Since both Word and Excel objects are open at the time of the save, I want both objects to close without saving. The last error, 9, can happen when a record has been added to the table without a corresponding spreadsheet in the workbook. This error is handled just like 4152, but displays a different error message.
All other errors will be handled by the Case Else and will result in the error description and number being displayed and the program ending. It's always a good idea to add a generic error handler as users can always find ways to create errors that the developer can't anticipate. Since I don't know what the error might be, I don't know what objects might be open, so I don't attempt to close them.
HandleError:
'display appropriate error message
Select Case Err.Number
Case 5151 'Word template not found
'Close stranded applications
objXLBook.Close SaveChanges:=False
objXLApp.Quit
MsgBox "Word template not found"
Case 432 'Excel spreadsheet not found
MsgBox "Excel spreadsheet not found"
Case 5152 'Invalid file name
'Close stranded applications
objXLBook.Close SaveChanges:=False
objXLApp.Quit
objWord.ActiveDocument.Close SaveChanges:=False
objWord.Quit
MsgBox "This file or folder does not exist"
Case Else
MsgBox Err.Description, vbExclamation, _
"Error " & Err.Number
Set objXLBook = Nothing
Set objXLApp = Nothing
Set objWord = Nothing
Set rsReportData = Nothing
Set rsExclusions = Nothing
Set db = Nothing
End Select
Resume ProcDone
End Sub
Running the Code
Now the code is complete and ready to run. All that's necessary is to call the routine from a button or some other Event Procedure, like so:
Private Sub cmdRun_Click()
Call ExcelWordAutomation
End Sub
On completion, your folder will have one report document for each record in the ReportData table.
Conclusion
Office Automation is a powerful tool for integrating separate Office applications. By using a single macro language for all of the Office applications and exposing the object models of each, Microsoft made it possible to build custom applications that would be difficult any other way. The possibilities are limited only by the imagination of the developer.
You can download a sample database illustrating all the code here, AutomatingWordFromAccess .
.
One of the strengths of the Microsoft Office suite is the ability for its component parts to communicate between themselves. It is particularly useful to communicate between Access and Excel because while Access is superior at storing data, Excel is superior at manipulating it. For example, I am often asked if it's possible to send data from Access to formatted cells in Excel and create a chart based on it.
This problem can be solved by extensive use of Office Automation, but many people find this prospect daunting. Office Automation through VBA (Visual Basic for Applications) is an extremely powerful but complicated method. I discussed this method in my post: How do I export Access data to Excel - Part 3.
But there are other methods, like the Access TransferSpreadsheet method, that are easier to use, but far more limited. How do I export Access data to Excel - Part 2
A Middle Ground
However, it's also possible to solve with a combination of built-in features of both Access and Excel, that is, Excel templates, a tiny bit of Office Automation, and the Access TransferSpreadsheet method. This middle ground uses the strengths of both, and is both easy and flexible.
The TransferSpreadsheet method allows me to export a query or table from Access to Excel. If the workbook does not exist, it will create one. If the workbook does exist, it will create a new sheet in the workbook named after the table or query. But if both the workbook and sheet already exist, Access will over-write the data in the sheet. This is the critical feature.
Another feature I'll make use of is Excel's ability to link cells from one sheet to another. This means I can link a chart on one worksheet to another worksheet that holds the data. If I use the TransferSpreadsheet method to export a query that overwrites the data in the data worksheet, my chart will be updated automatically.
Lastly, I will use an Excel template to create a new Excel workbook with pre-formatted cells and charts. An Excel template is a special kind of workbook with a .xltx extension. When you open a template, it automatically creates a new workbook with a .xlsx extension, leaving the template untouched.
These features, used in combination with a small amount of Office Automation, give me all the tools I need to accomplish the task.
Overview
The overall process goes something like this:
Creating the Template
First thing to do is create an Excel template.
You might think I could simply create a data worksheet manually and name the tab after my exported query. Unfortunately, it's not that easy. That's because the TransferSpreadsheet method looks for a named range to export to, not a worksheet name. So if I create a worksheet named after my query, say Drug1, when I export the query, it will create a new worksheet called Drug1(1) instead of exporting to the worksheet I want.
The easiest way around this is to use the Access TransferSpreadsheet to export my query to a blank workbook. This will create the data worksheet automatically for me with the proper named range. Then I'll re-save it as a template so the export routine will find the correct worksheet for the next time.
So to start, I create a blank workbook and save it as a template. To do that, choose File > SaveAs and in the file type box choose Template(*.xltx). Now, Excel will try to save this in the default templates folder. I prefer to store this template with the database, so I then browse to the folder where the database exists and save it there.
Setting a Reference to Excel
Next, I switch to Access to create the export routine. But before I do that, I need to set a reference to Excel in Access. A reference is a call to an external code library, in this case the Excel Object Model. This will allow me to manipulate Excel objects from within Access.
To set a reference, I open the Visual Basic Editor. Then I go to Tools > References. In the dialog box, scroll down to Microsoft Excel 15.0 Object Library (your version number may vary). Click the checkbox next to it and click OK. Figure 1 shows what the References Dialog looks like.
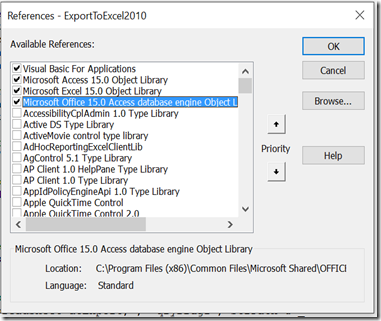
Figure 1: The References Dialog showing the Excel Object Library reference.
Export Program
Next, I'll create the Access subroutine (called ExportSpreadsheet), which exports the data to Excel. I start the routine with a call to an Error Handler. I'll explain why later.
Sub ExportSpreadsheet()
On Error GoTo HandleError
Next, I'll declare some variables.
Dim objXLApp As Object
Set objXLApp = CreateObject("Excel.Application")
Dim objXLBook As Excel.Workbook
Dim strFile As String
Dim strPath As String
I also need to find the folder where the database resides. This is where the template is stored and also where I'll save the completed workbook. Naturally, if I wanted the files stored elsewhere (say a specific directory), I could code that here, too.
strFile = CurrentProject.Name
strPath = CurrentProject.Path
Now, I want to delete the existing workbook if it exists. I do this keep the SaveAs dialog box from asking me if I want to over-write the existing file. This is most useful if I am creating multiple workbooks.
Kill strPath & "\MySpreadsheet.xlsx"
Next, I need to create a workbook from the template. To do that, I have to use a tiny bit of Office Automation. I have to open an Excel Application object and an Excel Workbook object.
Set objXLApp = New Excel.Application
Set objXLBook = objXLApp.Workbooks.Open(strPath & _
"\MyTemplate2010.xltx")
Next, I save the workbook object as a workbook and close it.
objXLBook.SaveAs (strPath & "\MySpreadsheet.xlsx")
objXLBook.Close
Which leaves a file called "MySpreadsheet.xlsx" in the same directory as my Access database. Next I use the TransferSpreadsheet method to export two queries to the workbook. Because I am specifying the same workbook, each query will create a separate worksheet in the workbook.
DoCmd.TransferSpreadsheet acExport, , "qryDrug1", strPath & _
"\MySpreadsheet.xlsx", True
DoCmd.TransferSpreadsheet acExport, , "qryDrug3", strPath & _
"\MySpreadsheet.xlsx", True
Sometimes, the chart data is not refreshed in the resulting workbook, so I'll open the workbook and save it again. This takes care of the refresh problem.
Set objXLBook = objXLApp.Workbooks.Open(strPath & _
"\MySpreadsheet.xlsx")
objXLBook.Save
objXLBook.Close
Then I add a message box that identifies when the process is done.
MsgBox "Done!" & vbCrLf & vbCrLf & _
"Look in the directory" & vbCrLf & vbCrLf & _
"where the application resides for ""MySpreadsheet.xlsx"""
Lastly, I complete the error trapping. After the ProcDone label, I'll destroy the object variables I've created. I do that here so if there is an error and the routine terminates, an Excel object won't be left in memory.
ProcDone:
Set objXLBook = Nothing
Set objXLApp = Nothing
ExitHere:
Exit Sub
There are two main errors that must be handled. Error 1004 occurs if the Template does not exist. In that case, I just want the routine to end without doing anything else. The other error, 53, happens when the MySpreadsheet.xlsx file (that I'm trying to delete with the KILL command) does not exist. In that case, I just want the routine to continue.
HandleError:
Select Case Err.Number
Case 1004 'a template does not exist
MsgBox "There is no template for this chart."
Resume ProcDone
Case 53 'Excel file cannot be found to delete
Resume Next
Case Else
MsgBox Err.Description, vbExclamation, _
"Error " & Err.Number
Resume ProcDone
End Select
End Sub
In this example, I am going to export two queries (Drug1 and Drug3) to my spreadsheet and create two separate charts based on them. Because of that, I'm going to hard code the query names into the routine. But to utilize the real power of this process, you could store a list of queries to be exported in a table, then create a loop that would march through the table, exporting each query in turn. In this way, you could create literally hundreds of charts in just a few minutes. If your process requires dozens or hundreds of charts created every month, this could be quite handy.
Running the Code the first time
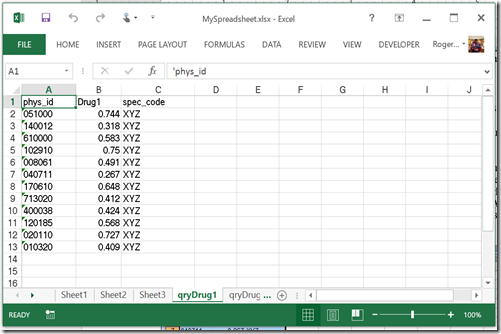
So far, all I've got is an empty template and my Export routine. The next step is to run the Export code for the first time. When that happens, my previously empty spreadsheet has two worksheets: qryDrug1 and qryDrug3.
Figure 2 shows the resulting workbook.
Figure 2: Workbook created by the first run of the ExportSpreadsheet subroutine.
Create worksheet with formatted data and chart.
Now I have to manually create two new worksheets, which I'll name Drug1 and Drug3. These will hold my formatted data and charts. (Since the process is the same for both charts, I'll just concentrate on Drug1, but you should realize that you can create as many charts as you want up to the 255 sheet limit of Excel.)
So next, I need to link the cells containing the data in sheet qryDrug1 into my new Drug1 sheet. To do that, I open the Drug1 sheet and select cell A1, hit the equal key (=), click on the qryDrug1 tab to go to that sheet, click cell A1 in that sheet, and finally click the green check mark on the Formula bar. The resulting formula looks like this: =qryDrug1!A1. Next, select cell A1 and click the Copy button, select the range A1:C13 and click Paste. Figure 3 shows the resulting worksheet.
Figure 3: Worksheet of cells linked to the data on qryDrug1.
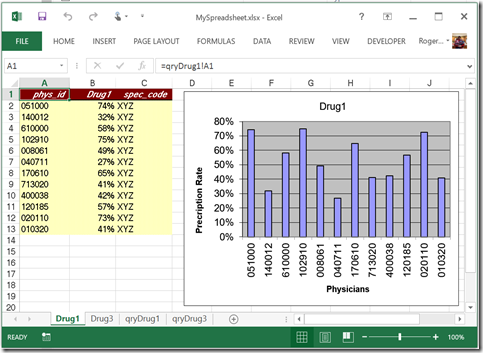
Now I can format this data. For simplicity, I'll just apply an auto format, then I'll format the cells in column B as Percent with no decimal places. Figure 4 shows the results of the formatting.
But I'm not done with this sheet. I also want to create a chart on this data. So I'll use the Chart Wizard to create a bar chart comparing the drug prescription rate for each physician. Figure 4 also shows the resulting chart.
Figure 4: Formatted data and chart based on the data linked on the worksheet.
Notice that while the chart is based on the formatted data, the actual data resides on the qryDrug1 worksheet. This is important because the Drug1 information in the qryDrug1 worksheet is not formatted as percent. If I based the chart on the qryDrug1 worksheet, the Y axis of my chart would not automatically be formatted as percent either. By linking the data and formatting it, I can control the format of the chart.
Repeat these steps for the Drug3 worksheet.
Save Workbook as Template
I'm almost done now. All that's left is to save my finished spreadsheet as a template, overwriting my existing MyTemplate.xltx template. Again, Excel will try to save the template in the default Templates folder, so I have to browse to the application folder to save it over the existing template.
Lastly, I need to delete the data in the data worksheets: qryDrug1 and qryDrug3. It's very important to just delete the data and NOT the worksheets themselves. To do so will put #REF in each linked cell and all the linking will be lost. But just clearing the data from the exported data worksheet will leave the links intact. Figure 5 shows the cleared worksheet.
Figure 5: Formatted data and chart with data deleted from the qryDrug1 worksheet.
Re-Run the Program
That's all there is too it. Running the program again will open the new template, save it as a workbook, export my queries to the existing worksheets, which will display in the linked cells and chart. Figure 6 shows the final result.
Figure 6: Results of running the export to the completed template.
Conclusion
Microsoft Access has some powerful tools for communicating with Excel. Some of these tools, like the Transfer Spreadsheet method, are very easy to use but limited. Others, like Office Automation, are flexible but complicated. But as I have shown, by using the strengths of both products, you can accomplish this in a way that that is both easy and flexible.
To download a working sample database, follow this link: ExportToExcelCharts.mdb (intermediate)

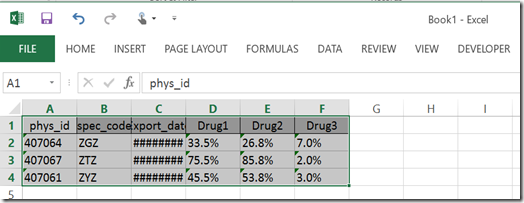


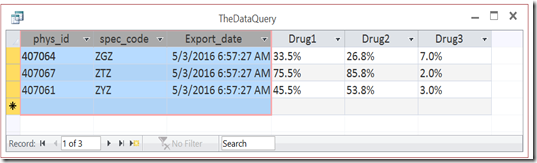


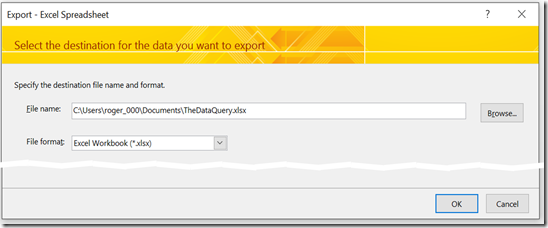
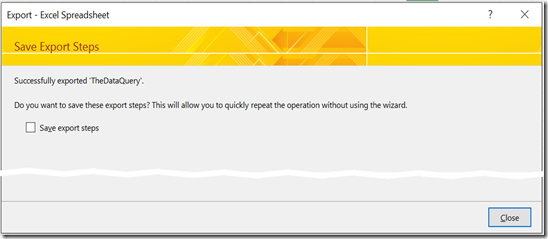

There are many ways to export data from an Access database to an Excel spreadsheet. These include:
In Part 1, I discussed various manual methods. This time I’ll look at the TransferSpreadsheet method, which allows you to have more control over automating exports.
Import Export Spreadsheet – Macro Action
Macros in Microsoft Access offer a quick easy way to automate some processes. Macros are created and maintained in a graphical user interface, You don’t have to do any coding or know a programming language.
To create a new macro, go to the Create tab on the ribbon and choose Macro.
The Macro Editor will look like this
To add a new macro action, click the drop down, Add New Action. However, you’ll note that the ImportExportSpreadsheet action is not in the list.
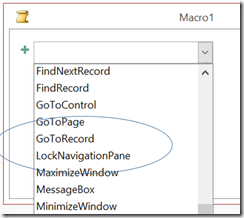
This is because when Action Catalog is selected on the ribbon, you only get actions the Microsoft considers “safe”. In this case, that means that using any of these actions don’t require the database to be in a Trusted Location. Unfortunately, ImportExportSpreadsheet is not one of those actions, so you’ll need to select Show All Actions, instead.
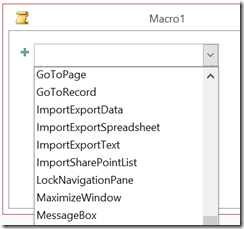
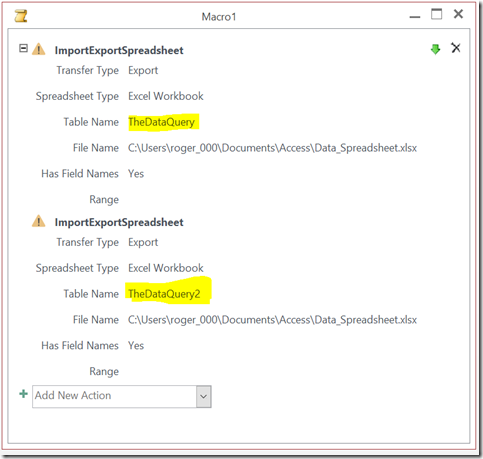
Now you can select ImportExportSpreadsheet. You’ll get a number of options to fill out:
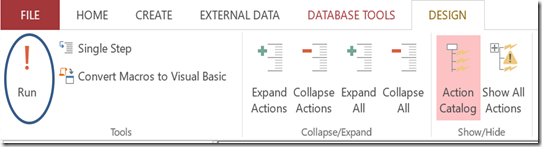
Run the macro using the Run button on the Design tab.
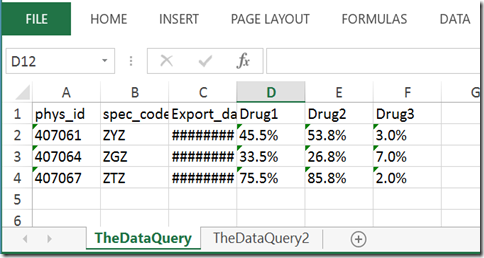
It will create a workbook named Data_Spreadsheet.xlsx with a datatab called TheDataQuery.
Why Bother?
There’s no real value to creating a macro for a one-time export. However, a macro will allow you to export multiple times or multiple “tables” or both. So to export a second “table”, I simply add another macro action.
The file name also determine how multiple exports are handled.
Transfer Spreadsheet – VBA Method
The Macro method is useful if you always export the same tables or queries to the same locations. It’s also very easy to set up. However, since all the table names and path/file names are hard coded, to change anything, you have to modify the application. This is less than ideal if you want to the application to be used by non-developers.
A better way is to store the names of the queries/tables in a tables and use a bit of VBA to repeat the export process for each value in the table.
Converting Macros to VBA
Fortunately, you don’t have to start from scratch. You can convert an existing macro to a VBA procedure, which will give you the basic layout. To do this,open the macro in Design View and click: Convert Macros to Visual Basic
The procedure will appear in a Module named for the macro and will look something like this:
'------------------------------------------------------------
' Macro2
'------------------------------------------------------------
Function Macro2()
On Error GoTo Macro2_Err
DoCmd.TransferSpreadsheet acExport, 10, "TheDataQuery", _
"C:\Users\roger_000\Documents\Access\Data_Spreadsheet.xlsx", _
True, ""
DoCmd.TransferSpreadsheet acExport, 10, "TheDataQuery2", _
"C:\Users\roger_000\Documents\Access\Data_Spreadsheet.xlsx", _
True, ""
Macro2_Exit:
Exit Function
Macro2_Err:
MsgBox Error$
Resume Macro2_Exit
End Function
'------------------------------------------------------------
If I had named my macro something relevant, like “Export_Data”, the procedure would be named for that.
Creating an Export table.
Next, I will create a table called MyExport which will hold the text values of the table and filenames I want exported.
Then modify the code as follows. I’ve added comments in the code to explain the modifications
'------------------------------------------------------------
' Export_Data
'------------------------------------------------------------
Sub Export_Data()
On Error GoTo Export_Data_Err
'add object and scalar variables
Dim db As DAO.Database
Dim rs As DAO.Recordset
Dim TheTable As String
Dim TheFile As String
'open the Export Table (MyExport) as a recordset
Set db = CurrentDb
Set rs = db.OpenRecordset("MyExport")
'loop through recordset
Do While Not rs.EOF
'set scalar variables
TheTable = rs!Export_Table
TheFile = rs!Export_Filename
'export the table using the variables
DoCmd.TransferSpreadsheet acExport, 10, TheTable, _
TheFile, True, ""
'move to the next record
rs.MoveNext
Loop
Export_Data_Exit:
Exit Sub
Export_Data_Err:
MsgBox Error$
Resume Export_Data_Exit
End Sub
'------------------------------------------------------------
Note: I prefer Sub procedures rather than functions in this case, so I modified it shown in the highlighting.
Now Just Run It
Next I just run the code (usually by way of a button on a form), and the indicated tables/queries will be exported. In this case to the same workbook. I can export them to different workbooks by simply changing the filenames in the MyExport table. This can be useful if you want each query to go to a different user’s folder.
Download A Sample
You can find the companion sample here: ExportToExcel_TransferSpreadsheet
Taking It Further
You can take the automated process even further by exporting the data for a formatted sheet or chart using an Excel template. You can download samples with complete explanation here:
Next up, in Part 3, I’ll show how to automate exports even further using Office Automation.