Wednesday, May 31, 2017

Entity-Relationship Diagramming: Part I

In the last series, Normalization Parts I, II, III, IV, and V, I approached normalization from a particular point of view. I put all the information into a single table then removed redundancies into separate tables. This method is called decomposition. Decomposition is fine for understanding the theory of normalization and for creating small databases. However, it is less useful for large databases. At least, I've found it so.

So I'm going to talk about another way to approach normalization that starts with the individual pieces and builds it up into properly normalized tables. This method is called the Entity-Relationship method and the final result is an Entity-Relationship Diagram. An E-R diagram is useful not just for creating the data model, but for documenting it as well.

Since we've been working with the Employee Database in our other examples, let's stick with it. But since I claimed that E-R method works for more complicated designs, let's make it a little more complex. I like to start with a short narrative of the requirements.

Narrative

ZYX Laboratories requires an employee tracking database. They want to track information about employees, the employee's job history, and their certifications. Employee information includes first name, middle initial, last name, social security number, address, city, state, zip, home phone, cell phone, email address. Job history would include job title, job description, pay grade, pay range, salary, and date of promotion. For certifications, they want certification type and date achieved.

An employee can have multiple jobs over time, (ie, Analyst, Sr. Analyst, QA Administrator). Employees can also earn certifications necessary for their job.

Next, I take the narrative and underline all of the nouns. (I'm going to bold them here because Blogger doesn't have underlining.)

Narrative 2

ZYX Laboratories requires an employee tracking database. They want to track information about employees, the employee's job history, and their certifications. Employee information includes first name, middle initial, last name, social security number, address, city, state, zip, home phone, cell phone, email address. Job history would include job title, job
description
, pay grade, pay range, salary, and date of promotion.
For certifications, they want certification type and date achieved.

An employee can have multiple jobs over time, (ie, Analyst, Sr. Analyst, QA Administrator). Employees can also earn certifications necessary for their job.

All of these nouns must be represented in the database -- some as Entities and some as Attributes. An Entity is a "thing" about which we store information. An Attribute is the information that is being stored.

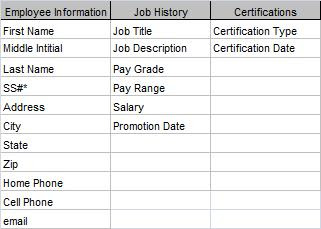
So the next task is to group the nouns into logical groupings. At first pass, it appears that there are three entities: Employee Information, Job History, and Certification. It is useful at this point to put them in a grid and assign the rest of the attributes like Figure 1.

Figure 1: Attribute Grid

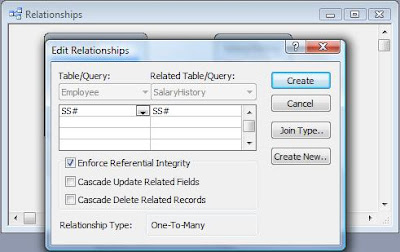
Next, I need to assign primary keys to each entity. (At this point, I call them "entities" rather than "tables".) As I said in What Is A Primary Key?, a primary key is a field or fields which uniquely identify a record. At this point, I'm dealing only with natural keys. Figure 2 shows the primary keys.


Figure 2: Attribute Grid with Primary Keys

Now we go back to our entities and look for two things:

  1. see if each attribute can have only one value for that entity, and
  2. see if each attribute truly belongs to the entity.

To determine the second, we look at "functional dependencies", which just means that each field's value depends on the value of the primary key.

So, for the Employee table, a person (as represented by the SS#) can have only one first name, last name, address, home phone, and so forth. That satisfies requirement #1. Secondly, if the value of the SS# changes, then so will all of those values. By that, I mean if we move to a different entity with a different SS#, that entity will have a different first name, last name, etc. (For our purposes here, we will assume that no two employees share any of these attributes.)

Now, what about the Job History table? Any time an entity has a compound primary key, you should look at it very closely to make sure all the fields depend on the entire primary key. Any particular job can have only one description, pay grade, and pay range. However, none of those depend on the Promotion Date.

I've got a problem here and I need to take another look. What I really have is information about two different "things".

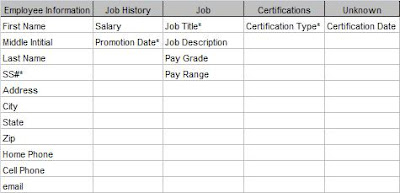
Job Title, Description, Pay Range and Pay Grade pertain to the Job as a category. Everyone who holds that position will have the same values. On the other hand, Salary and Promotion Date will be different for each person. So I really have two entities: 1) Job (information about the job itself), and 2) Job History (information about a particular employee's employment history.

I need take Job Title, Description, Pay Range and Pay Grade out of the Job History table and put them in the Job table.

Lastly, in the Certification table, Certification Date is also not fully dependant on the Certification Type. Different individuals achieve the certification at different dates. I don't have an entity to put the date in, so I'll put that to the side and come back to it later.

Figure 3 shows the amended grid.


Figure 3: Amended Attribute Grid

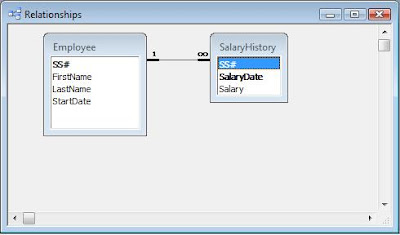
At this point, it is useful to look at the Relationships between these Entities. We may be able to find a place to put our unassigned attribute. But I'll save that for the next post: Entity-Relationship Diagramming: Part II.

.

Tuesday, May 16, 2017

What Is Normalization: Part V

Many-to-Many Relationships

In What Is Normalization, Part IV, I discussed the three basic kinds of relationships: One-to-One, One-to-Many, and Many-to-Many. In this post, I'll concentrate on the many-to-many.

Many-to-Many (M:M)
In real life, M:M relationships are extremely common. Each customer can order many products, and each product can be ordered by many customers. In high school, each teacher has many students, and each student has many teachers. At a conference, each attendee attends many sessions, and each session has many attendees.

Returning to our Employee Database example, suppose we want to store a job description as well as the salary history. Since each employee can hold many positions over the course of his or her career, and each position can be held by many employees, we have a many-to-many relationship. So let's go back and change our original table and see how we can normalize it.

Figure 1: Expanded Employee Table (Non-Normalized)

You'll notice that I've changed the SS# field in favor of an EmployeeID field. SS# is a really bad field for a primary key. You still might want to store SS#, but not for a primary key, so I'm leaving it out of this example.

Like the example in What Is Normalization Part II, the table has redundant data, and so it needs to be normalized. And just like in Part II, I'll remove the redundant Employee information into its own table, like so:

Figure 2: Employee Table

Figure 3: Job History Table


But looking at the Job History Table, we can see that we still have redundant data. Job Description is repeated several times. Unfortunately, we don't have a convenient linking field as we did with the EmployeeID field in the Employee Table. So we'll have to make one up. When you make up a primary key, as opposed to using an already existing field for your primary key, it is called a surrogate key. I discuss the difference between surrogate keys and natural keys in What is a Primary Key?

So, in order to remove the job description information, I'll create a table called Job Description and fill it with just one instance of each value. Then I'll also add a field called JobID, and fill that will it with unique values, thus creating a surrogate primary key. Next, I'll return to the Job History table and replace the job descriptions with the corresponding JobIDs. Like this:

Figure 4: Revised Job History Table

Figure 5: Job Types Table


Okay, so what does this have to do with Many-to-Many relationships? Well, if you look at Employee and Job Types, you can see that there is actually a many-to-many relationship between these tables. Each Employee can have many Job Types over time and each Job Type can apply to many Employees.

Unlike one-to-one and one-to-many, many-to-many relationships cannot be directly represented in a relational database. In order to create one in a database, we have to have an intersection table (also called a "linking table"). In this case, the linking table already exists: Job History.

To represent this M:M, you create a relationship between each of the main tables (Employee and Job Types) to the linking table (Job History), with the "many-side" on the linking table. The final relationship will look like this:

Figure 6: Many-to-Many Relationship Implemented


Notice that each primary key of the main tables is represented as a foreign key in the linking table, and while each of the foreign keys is part of the primary key of the linking table, neither is the entire primary key.

So far, I've approached Normalization from a particular perspective. I've put all the information into a single table, looked for redundant data, and removed the redundancy into a separate table. This approach is called "decomposition". It works very well for simple data models, but becomes unwieldy in complex models.

However, there is another approach that has proven easier for me to work with very complex data models. This approach is called Entity-Relationship Diagramming. In Entity-Relationship Diagramming: Part I, I'll talk about that.

.

Monday, May 1, 2017

What is Normalization: Part IV

More Relationships

In What Is Normalization, Part III, I discussed how to create a relationship to join our normalized tables back together so that no information was lost in the normalization process.

There are three basic kinds of relationships: One-to-One, One-to-Many, and Many-to-Many.

One-to-One (1:1)
A marriage is an example of a 1:1 relationship. A husband can have one and only one wife and a wife can have one and only one husband. Of course, in the real world, there are exceptions to this, but let's accept this as a general case.

To implement a one-to-one relationship, you must have a primary key in both databases, which stores the same information, SS# for example. So continuing with our employee database example, suppose we had a ContactInfo table which stored Address, City, State, Zip, and Phone.

In this simplified example, we'll assume that people have a single address and phone. The primary key for this table would also be SS# since each record in the ContactInfo table represents the contact information for a single employee.

To create the one-to-one relationship, I would click and drag the primary key from Employee (SS#) to the primary key of ContactInfo (also SS#). Although the fields are named the same in this example, they do not have to be, however, they MUST represent the same information. In the Relationship Window, it would look like Figure 1.


Figure 1: One-to-One Relationship


Notice there is a 1 on each end of the relationship.

In relational databases, 1:1 relationships have limited utility. In most cases, the data elements from both tables can be combined into a single table.

One-to-Many (1:M)

This type of relationship is also known as the parent/child relationship for good reason. If we consider a biological parents only, we can say each mother can have one or more children and each child can have one and only one mother.

As I showed in Part III, the relationship between Employee and Salary History is a one-to-many relationship where each record in the employee table can be related to multiple records in the Salary History table, but each record in Salary History is related to only one record in Employee.

To implement this type of relationship, you must have a field in the "child" table that corresponds to the primary key in the "parent" table. Again, this field is SS# in our example, However, unlike the one-to-one relationship, it is NOT the primary key of Salary History, although it may be part of the primary key. Figure 2 shows this relationship.


Figure 2: One-to-Many Relationship


One-to-Many relationships are extremely common in relational databases.

Many-to-Many (M:M)

In real life, M:M relationships are extremely common. You'll notice that in both the other illustrations, I had to qualify the definition of both a marriage and parent/child. That's because real world definitions are messy. In some places in the world, a man can have multiple wives and a woman, multiple husbands. Sometimes simultaneously. Children can have more than one parent. In the real world, these relationships many-to-many.

Because many-to-many relationships are common in the real world, we must also know how to represent them in relational databases. Unfortunately, M:M relationships cannot be represented directly. They must be represented indirectly by a linking table and a pair of 1:M relationships.

In What Is Normalization: Part V, I'll show how.

.

Thursday, April 20, 2017

What Is Normalization: Part III

Putting It Back Together

In What Is Normalization, Part I, I defined normalization and the negative consequences of not normalizing your database. In Part II , I talked about how to normalize your tables to remove as much redundant data as possible. Now, it isn't much good to split your data into separate tables without the ability to put it all back together. For that, we need to talk about relationships.

Relationships store the information about how normalized data can be put back together. They are the heart and soul of a relational database like Microsoft Access. If you don't have relationships in your database, you don't really have a relational database.

Continuing our example from Part II, we have two tables: Employee and Salary History.

Figure 1: Employee

Figure 2: Salary History

So how do we create a relationship between them? In a relational database, tables are related on common data elements -- specifically the primary key of one table and the foreign key in the other. I've defined primary key elsewhere, but foreign key is new. A foreign key is simply a field in another table that has the common data elements needed to create a relationship.
In our example, SS# is the primary key of Employee. In the Salary History table, SS# is the foreign key to the Employee table. If you've normalized your database properly, your related table should have a foreign key. Figure 3 shows how the data in our two tables will be related.
Figure 3: The tables related

So how do we create this relationship? In Access, the easiest way is to use the Relationship Window. In Access 2003 and before, it can be found on the Database Toolbar or on the menu choosing Tools > Relationships. In Access 2007, go to the Database Tools tab on the Ribbon and choose Relationships.
To create your relationship, add both tables to the Relationship window. I usually RIGHT-click on the empty relationship window and choose Add Table. Your window should look like Figure 4.
Figure 4: Relationship window with tables added.

Next, Click on the primary key (SS#) in Employee and drag it over to the corresponding field in Salary History (also SS#). When you finish, the Edit Relationships dialog box will pop up. Figure 5 shows the dialog box.
Figure 5: Edit Relationships dialog box

It will already have the fields filled in. In order to actually make this a relationship, however, you MUST click the Enforce Referential Integrity check box. If this box is not checked, it it NOT a relationship.
If you cannot click the Enforce Referential Integrity box, then there is something wrong with your relationship. More than likely, it will say Indeterminate as a Relationship Type. Usually, this means you have attempted to create a relationship without one of the fields being a primary key. Don't simply uncheck the box and continue. Go back and fix the fields.
Click Create to finish the relationship.
Figure 6: Completed Relationship

You can tell that Referential Intergity has been enabled because the relationship line has a 1 on one end and an infinity symbol on the other. This indicates it is a One-to-Many relationship. That is, each record in the Employee table is related to one or more records in the Salary History table. The 1 will be next to the table where the link field is the primary key. If you do not have those symbols on your relationship, you do not have a relationship.
Here, I showed the One-to-Many relationship, which is the most common type in a relational database. But there are two others: One-to-One and Many-to-Many. I'll talk about those next in What is Normalization: Part IV.
.

Sunday, April 2, 2017

Access 2010 Web Databases: Viewing Tables In SharePoint

Unfortunately, as of Access 2019, Access Web Apps have been discontinued.  From the March 2017 announcement from Microsoft:

“We no longer recommend Access Services for new apps. This feature will be retired from Office 365. We will stop creation of new Access-based apps in SharePoint Online starting June 2017 and shut down any remaining apps by April 2018.”


In this blog series, I'm discussing how to convert an existing Access application to a web application (the series starts here: How Can I Put My Access Database On The Web?). As with any database project, I'm starting with the data.

When I attempted to upload my existing tables into SharePoint, I got a number of errors (
Uploading the Data to SharePoint). I dealt with some of them (primary keys and unique indexes) in my last post (How can I create a Compound Unique Index?). I discussed errors in creating relationships in a web application (Creating Relationships). Last time, I talked about loading the tables into SharePoint (Uploading To SharePoint).

This time, I want to take a look at the tables in SharePoint itself. It's not really necessary. You can and should do everything you need to do in Access. However, viewing your application in SharePoint can be instructive.

Go to File > Info:
[click to enlarge]

And click the link. The opening screen will look like this:

[click to enlarge]

The Design With Access link will allow you to make changes to the application in Access. I should point out here that you should always make any changes in Access and not directly in SharePoint. You can easily mundge your database into uselessness. Clicking the link will download a new copy of the application (with an ACCDW extension) to your hard drive. Make your changes and then save it back to SharePoint.

If you want to delete the application, under Settings, click the Delete This Site link. You won't do this often with a production database, of course, but if you're experimenting, you might need to do this. In the course this series, I did it quite a lot.

Table Properties
 I can look at my table properties as well. Navigate to your lists/table by going to a URL like so:

http://<yourserver>/<yoursite>/Lists/<yourtablename>/Allitemsg.aspx

You should see your table/list in datasheet view. Click the List Settings button on the List tab of the SharePoint Ribbon.
[click to enlarge]

Clicking AuthorID, I can view the properties of that table:

[click to enlarge]

From this, I can see that all the properties I set up in Access – including the relationships – made the transition to SharePoint. However, I want to re-emphasize that although you can view your tables in SharePoint, you should never modify them there. With Access Services, everything begins and ends in Access.

Next my next post (
Other Compatibility Errors), I'll finish up the data portion of this series by looking at other data related issues that you need to watch out for.
.

Access 2010 Web Databases: Other Compatibility Errors

Unfortunately, as of Access 2019, Access Web Apps have been discontinued.  From the March 2017 announcement from Microsoft:

“We no longer recommend Access Services for new apps. This feature will be retired from Office 365. We will stop creation of new Access-based apps in SharePoint Online starting June 2017 and shut down any remaining apps by April 2018.”


In this blog series, I'm discussing how to convert an existing Access application to a web application (the series starts here: How Can I Put My Access Database On The Web?). As with any database project, I started with the data.

When I attempted to upload my existing tables into SharePoint, I got a number of errors (Uploading the Data to SharePoint). I dealt with some of them (primary keys and unique indexes) in my last post (How can I create a Compound Unique Index?). I discussed errors in creating relationships in a web application (Creating Relationships). I talked about loading the tables into SharePoint (Uploading To SharePoint). Last time, I showed how to view the tables in SharePoint (Viewing In SharePoint).

In this final post discussing moving legacy tables from Access to SharePoint, I'll look as some other common errors that keep your tables from uploading to SharePoint.

Other Compatibility Errors

  1. Property value contains one or more characters that are incompatible with the Web.
    Table, field, and control names cannot contain characters that the Access client will accept. They cannot be longer than 64 characters and may not contain any of the following: / \ : * ? "" < > | # <TAB> { } % ~ & period (.), exclamation point (!), square brackets ([]), leading space, or begin with an equal sign (=).
  2. Only one of the Allow Zero Length property and Required property should be set to 'true' to be compatible with the Web.
    As the error says, you can't set both the Allow Zero Length and Required property of a field to "yes".
  3. Property value should to be empty or set to 'auto' to be compatible with the Web.This error refers to subdatasheets, which are not allowed in SharePoint lists. To correct it, set the Subdatasheet Name property of the table to [None] or [Auto]. You'll also get this message if you have values in the Link Child Fields and Link Master Fields properties. These properties must be empty.
  4. Calculated Column expression has an input field of a type incompatible with the Web, such as AutoNumber, Lookup, Memo, Hyperlink or Binary.
    Calculated columns are new to Access 2010, so they won't be in legacy systems. However, if you do use them, you can only use the following data types: Text, Number, Currency, Yes/No, Date/Time.
  5. Calculated Column result data type is incompatible with the Web.
    Likewise, the result of a calculated column can only be of the following data types: Text, Number, Currency, Yes/No, Date/Time.
  6. Column data type for value list lookups must be 'Text' to be compatible with the web.
    If you use a Value List for a lookup field (which I strongly advise against, anyway), it has to be filled with Text values. You cannot use numbers. A better solution, however, would be to create reference lists that you can query to fill the list.
There are others. I won't try to list them all here. In the Web Compatibility Issues table created by the Compatibility Check, there will be a link referencing each error.

Then, of course, there are errors (many, many of them) associated with uploading your application (forms, reports, etc.) to the web. I'll deal with those in a later series.
.

Access 2010 Web Databases: Uploading to SharePoint

Unfortunately, as of Access 2019, Access Web Apps have been discontinued.  From the March 2017 announcement from Microsoft:

“We no longer recommend Access Services for new apps. This feature will be retired from Office 365. We will stop creation of new Access-based apps in SharePoint Online starting June 2017 and shut down any remaining apps by April 2018.”


In this blog series, I'm discussing how to convert an existing Access application to a web application (the series starts here: How Can I Put My Access Database On The Web?). As with any database project, I'm starting with the data.

When I attempted to upload my existing tables into SharePoint, I got a number of errors (
Uploading the Data to SharePoint). I dealt with some of them (primary keys and unique indexes) in my last post (How can I create a Compound Unique Index?). Last time I discussed errors in creating relationships in a web application (Creating Relationships).

I'm finally ready to upload the tables to SharePoint. Before I do that, however, I need to check the compatibility again (see Compatibility Checker). Assuming there are no more errors to correct, I can Publish To Access Services.

Access Services


Obviously, I need a SharePoint 2010 site with Access Services installed. While it's always possible to set up my own server, there are various hosting companies that provide Access Services, and there will be more in the coming years.

Important Note: Hosting services for this blog series are provided free of charge by http://www.accesshosting.com/. They are one of the first SharePoint providers specializing specifically in Access Services. If you'd like to try anything from this blog series, AccessHosting provides a 30-day free trial. They also have a Developer Sandbox option for developers to use Access Services and prototype solutions for customers beyond the 30 day trial.

So once I have my hosting account, I can fill in the appropriate information: the Server URL and the Site Name. The Server URL is my account on the SharePoint host and the Site Name is the name I want the site to have. In my case I chose the name of my database.


Once the information is filled in, the Publish to Access Service button will become active. Clicking it will bring up a login window.

After entering my password and clicking OK, I'll see a dialog box that shows the various object being uploaded to SharePoint


When it's done, I'll see the following:

Publishing to SharePoint produces a number of irreversible changes to the database, which I'll discuss presently. Fortunately, Access makes a copy of the original, pre-upload database with a "_Backup" suffix, so if you have problems, you can easily go back to your original version.

Database Changes

The first and most obvious change is that my tables now look different


The icon in front indicates they are now SharePoint Lists. As such, you can no longer go into Table Design view to modify your table. You must make any changes in the Table Tools Ribbon.


Between them, you have most of the table design ability of the Table Design View, limited, of course, to those properties that SharePoint list support.  Creating new objects like Queries, Forms, and Reports are more restricted.


Some queries like Aggregate Queries and Union Queries (to name just two) are not supported and forms can only be created in Layout View. Certain query, form, report, and code types are only supported in the "Client", that is, it will only run when used in Access as opposed to a Web Browser. This is useful in a Hybrid Web Application, but not in a Browser-Only application (which is what I'm hoping to develop here).

Many of the Database Tools are also absent in a Web Application. These include the Relationships Window, Performance Analyzer, Table Analyzer, and uploading data to SQL Server and SharePoint.


There are other differences that vary depending on the specifics of your database, but once you've uploaded your database to SharePoint, you need to be aware that some Access features are limited.

In my next post, (
Viewing In Sharepoint), I'll look at the tables in SharePoint.

.