In What Is Normalization, Part I, I defined normalization and the negative consequences of not normalizing your database. In Part II , I talked about how to normalize your tables to remove as much redundant data as possible. Now, it isn't much good to split your data into separate tables without the ability to put it all back together. For that, we need to talk about relationships.
Relationships store the information about how normalized data can be put back together. They are the heart and soul of a relational database like Microsoft Access. If you don't have relationships in your database, you don't really have a relational database.
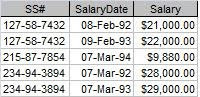
Continuing our example from Part II, we have two tables: Employee and Salary History.
Figure 1: Employee

Figure 2: Salary History
So how do we create a relationship between them? In a relational database, tables are related on common data elements -- specifically the primary key of one table and the foreign key in the other. I've defined primary key elsewhere, but foreign key is new. A foreign key is simply a field in another table that has the common data elements needed to create a relationship.
In our example, SS# is the primary key of Employee. In the Salary History table, SS# is the foreign key to the Employee table. If you've normalized your database properly, your related table should have a foreign key. Figure 3 shows how the data in our two tables will be related.
Figure 3: The tables related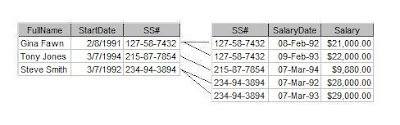
So how do we create this relationship? In Access, the easiest way is to use the Relationship Window. In Access 2003 and before, it can be found on the Database Toolbar or on the menu choosing Tools > Relationships. In Access 2007, go to the Database Tools tab on the Ribbon and choose Relationships.
To create your relationship, add both tables to the Relationship window. I usually RIGHT-click on the empty relationship window and choose Add Table. Your window should look like Figure 4.
Figure 4: Relationship window with tables added.

Next, Click on the primary key (SS#) in Employee and drag it over to the corresponding field in Salary History (also SS#). When you finish, the Edit Relationships dialog box will pop up. Figure 5 shows the dialog box.
Figure 5: Edit Relationships dialog box
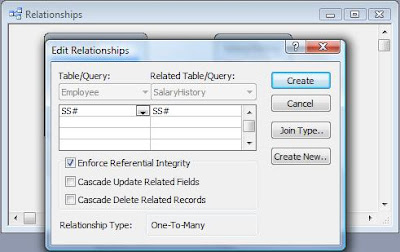
It will already have the fields filled in. In order to actually make this a relationship, however, you MUST click the Enforce Referential Integrity check box. If this box is not checked, it it NOT a relationship.
If you cannot click the Enforce Referential Integrity box, then there is something wrong with your relationship. More than likely, it will say Indeterminate as a Relationship Type. Usually, this means you have attempted to create a relationship without one of the fields being a primary key. Don't simply uncheck the box and continue. Go back and fix the fields.
Click Create to finish the relationship.
Figure 6: Completed Relationship
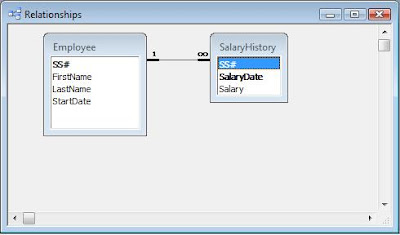
You can tell that Referential Intergity has been enabled because the relationship line has a 1 on one end and an infinity symbol on the other. This indicates it is a One-to-Many relationship. That is, each record in the Employee table is related to one or more records in the Salary History table. The 1 will be next to the table where the link field is the primary key. If you do not have those symbols on your relationship, you do not have a relationship.
Here, I showed the One-to-Many relationship, which is the most common type in a relational database. But there are two others: One-to-One and Many-to-Many. I'll talk about those next in What is Normalization: Part IV.
.
No comments:
Post a Comment